When formatting documents, InDesign users regularly face challenges—many of which can be easily fixed with Paragraph Styles, if you know how to. From fixing formatting issues when importing Microsoft Word documents to combatting common typography issues, Damian Gibbs, Solutions Consultant at Typefi, shares his top tips using InDesign Paragraph Styles.

Tip 1: Use Find/Change to keep list styling when importing a Word doc
The bullet and numbering list feature in Microsoft Word saves time when authoring and editing, but can be tricky when importing the document into InDesign, as it overrides any existing list styling.
When applying list styling in Word, the paragraph style remains the same even though the list type changes with each indenting level. This differs to InDesign where the list styling is set within individual paragraph styles.
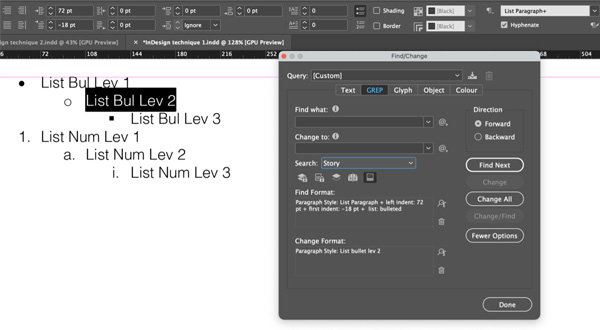
If you import a Word doc with lists into InDesign, the lists and indents will be applied as paragraph overrides (as they all use the same paragraph style). This can be frustrating for the designer who then has to manually apply the correct InDesign styles to each list paragraph with the override. This is where InDesign’s Find/Change feature is really helpful—find the paragraph style’s overrides and apply the appropriate InDesign paragraph style.
Once you’ve brought the Word document into InDesign, open the Find/Change dialogue box and fill in the fields.

Phew, problem solved!
Tip 2: Maintain numbered headings from Word, using defined lists
Staying with lists, here’s a great way to automate adding numbers to headings. Word documents that use numbered headings utilise Word’s auto-number feature. This is efficient during the authoring stage, as headings will renumber themselves on the fly if the content order shuffles. Unfortunately, InDesign doesn’t have the equivalent feature, and those automated numbers in an imported Word document will become static numbers in InDesign.
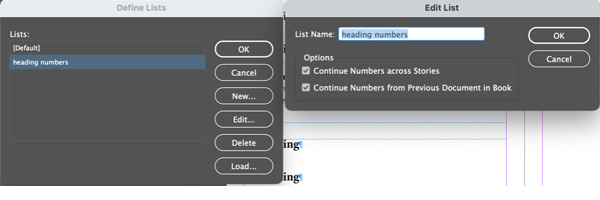
Thankfully, InDesign Lists and Paragraph Styles can fix this. First, you need to define a List. From the Type menu, select Bulleted & Numbered Lists then Define Lists… and click New.

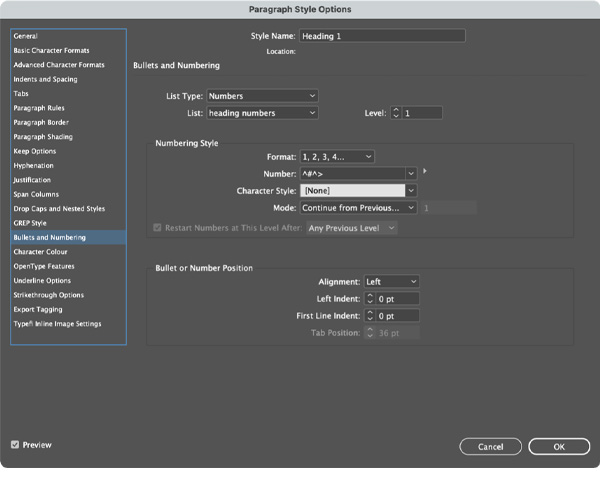
Click OK. Next, edit the Paragraph Style for the top level heading which you would like to have auto-numbered.

Repeat this process with the next level headings you‘d like included as part of the same numbering “chain”. Don’t use this same list for numbered paragraphs, as they will be treated as part of the same chain and your numbering sequence will go out of whack.
Accessibility tip: Exporting an InDesign document to EPUB or HTML, where headings use the List feature, will fail an accessibility QA. Fortunately, changing your final document back to static numbering is easy. Starting from the end of your document, select the last numbered heading. From the Type menu, select Bulleted & Numbered Lists, then select Convert Bullets and Numbering to Text.
Remember that repetitive and manual tasks in InDesign can often be automated via scripting. Check out this Scripting Webinar Series with Peter Kahrel, Typefi Engineer and scripting expert, to learn more.
Tip 3: Check the consistency of your headings with a Table of Contents (TOC)
We all know designers are perfectionists. Discovering a heading that’s 2pt smaller than the rest? Unacceptable. So, how can you see at a glance if your headings are consistent? A simple way is with a Table of Contents (TOC). Click Table of Contents Style (from the Layout menu) that includes the relevant heading’s Paragraph Styles. Generate and place your TOC somewhere in your document, even the paste board. You’ll instantly see all the headings in use throughout your document, on one page, making it easier to spot any inconsistencies. Too easy!
Tip 4: Adjust hyphenation and justification for improved legibility
You know good text when you see it—it’s easy to read and a joy to look at. Bad text is just as easy to spot with out-of-control hyphens and ‘gappy’ spacing. The Hyphenation and Justification features in Paragraph Styles can help avoid you getting into this type of trouble.
Hyphenation can be set in each paragraph style, which is useful as some content types—headings, bullet points, and quotes—often don’t need hyphenation, while body text and long-form lists often need a hyphen or two.
From the Paragraph Style Options dialogue, select Hyphenation, check Hyphenate and set the Hyphen Limit to “1” hyphens. This will prevent text from having two or more successive lines ending with a hyphen and is a simple way to improve the legibility of your text. An overlooked tool in InDesign is the fine controls for managing the spacing between words and letters—Justification. This feature also lives in the Paragraph Style Options dialogue box.
As not all fonts benefit from InDesign’s default Justification settings, spend some time upfront adjusting these settings before you begin a new project. Take into consideration the column width and typeface characteristics to see what gives your text the best legibility. For narrow text columns, try setting the Minimum values for Letter Spacing, Word Spacing, and Glyph Scaling to a smaller value which produces tighter text, but can also prevent ‘gappy’ lines appearing around hyphenated words.
Overcome many InDesign obstacles with Paragraph Styles
While you may face many obstacles when designing in InDesign, there is usually a simple enough way to overcome them—when armed with the right knowledge. Paragraph Styles are just one way to fix formatting and typographic issues.
For more practical typography advice, check out CreativePro Network or Adobe, and discover some great tools like WhatTheFont from MyFonts (which helps you ID unknown fonts), or our very own Typefitter, a plug-in for InDesign that can automatically find and fix common typographic errors.
This article first appeared on the BookMachine Design blog.

Damian Gibbs
Solutions Consultant | South Africa
Damian Gibbs has been involved in the publishing industry for over 20 years, beginning as an apprentice typesetter. He now works as a Solutions Consultant at Typefi, where he specialises in developing and supporting automated workflows for standards publishers.
